Best Verbling Alternatives for Language Learning in 2026
Compare Verbling alternatives for language learning. Review features, pricing, and tutor options to find the platform that fits your goals.
Create a student account
Lrnkey
Jan 25, 2022Explore more than 500+ high-income skills with highly motivated tutors
At first, it might feel like a monumental task when learning how to bead for beginners. But realistically, you just need to become familiar with the basic beading supplies and techniques of this creative skill. After that, you’ll be ready to start your first jewelry project.
Learning how to bead as a beginner is all about understanding your materials and tools. You’ll need essential equipment such as wire cutters, pliers, beading cord, clasps, and more to get started. Selecting the correct bead according to material and size is also vital. Then, practicing the technique required to execute your project is paramount to completing your first project.
You may feel confused about where to begin with all the different options available today. But we have compiled a fantastic guide on how to bead for beginners that will help you start your beading journey.
We cover everything from selecting the correct type of tools or beads to some basic beading techniques you can try. People have loved making bead jewelry for years, and today you’ll find out why. So, let’s dive in and discover the basics of how to make Jewelry for Beginners.
Selecting the correct tools is your first step towards learning to bead. Creating a high-quality jewelry piece with low-quality tools is difficult, even for advanced jewelry makers. You should invest in a few essential, good-quality tools that will help you throughout your beading journey.
It doesn’t matter whether you are thinking of making a friendship bracelet or a beaded necklace. There are a few must-have tools and accessories you should buy before learning how to bead for beginners.
Wire cutters, round-nose pliers, flat-nose pliers, beading cord, assorted clasps, a crimping tool, and crimp beads are part of a standard kit. Memory wire, a tape measure, and adhesive are also essential elements.
Most people try to scrounge in their toolbox for tools that will “sort of” meet the criteria. However, investing in the right, good-quality tools would help you make flawless jewelry pieces from the get-go.
The most exciting part of learning how to bead for beginners is supply shopping. With so many options to choose from, it might be overwhelming. And you may feel compelled to buy every single bead you set your eyes on. However, you must determine which beads will be best for your first project and purchase accordingly.
Jewelry-making beads are available in various sizes and are measured in millimetres. Between 10 mm and 14 mm, the larger beads are great for trendy and funky pieces. Beads of 6 mm to 8 mm are considered medium-sized and are perfect for making necklaces and bracelets. The tiniest beads between 3 mm and 4 mm are typically accent pieces placed next to larger beads.
The size of your beads will depend upon the project at hand. However, as a beginner, you should select beads sized 4 mm, 6 mm, and 8 mm as a start. These will be perfect for almost any project you tackle.
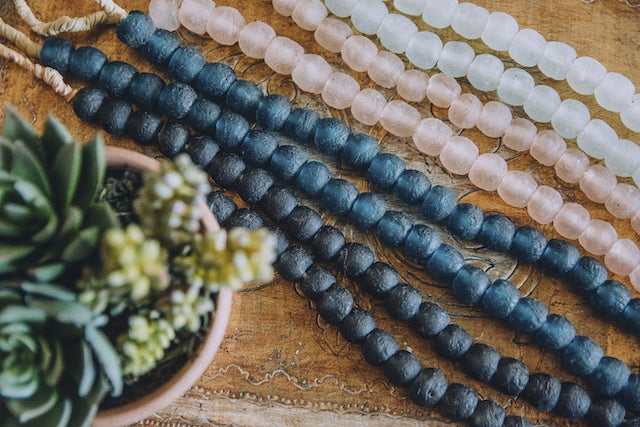
Getting beads in a suitable material is essential for learning how to bead for beginners. Good quality and affordable beads are usually made of glass or wood. And they’re available in multiple styles and effects. If you’d like to make a more high-end project, you can choose gemstones or crystals. These are perfect for a sterling silver jewelry piece.
I prefer buying a mix of glass, wood, and pearl beads. They can be used for almost any project, and they tend to make the jewelry look elegant. Additionally, you should always choose a neutral colour that is perfect for different projects.
Once you’ve learned the basics, you can try out your hand at using crystals or beads in vibrant colours.
Making jewelry with beads is an easy and exciting creative skill that can become a hobby. This is due to the simple components involved and the hundreds of designs available. Ensuring you’ve planned your first beading project carefully and gathered your supplies will help you learn how to bead for beginners.
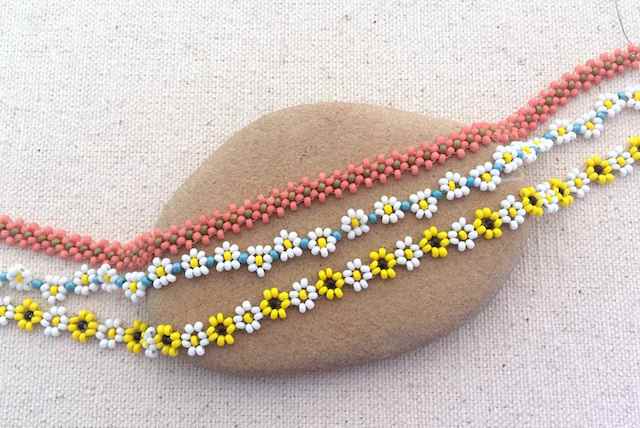
Beading is a very versatile craft. In fact, you can create anything from a keychain to a bracelet. Before learning how to bead for beginners, you should determine what you want to make. Bracelets and necklaces are the easiest first projects you can take on.
The best part about beading is there’s no limit to your creativity. Start by drawing the pattern you want for your jewelry piece. As a beginner, having some fun with bead colours might be a good start. You can use beads of the same shape and thickness and alternate between colours for your project.
Once you’re comfortable with the process, create variations of your design using different bead sizes, shapes, and colours. And try to use beads with smooth edges when beading a necklace, bracelet, earring, or ring with your creative skill.
Once you know what you’ll be making, you can gather your supplies, including beads, beading lines, clasps, scissors, and pliers. Arrange them properly on a non-slip cloth to ensure that your beads do not fall. And ensure that you can access your pliers quickly when you need them.
Gathering all your supplies at the beginning is crucial when learning how to bead for beginners.
Before starting your project, you should lay out your jewelry design the way you planned earlier. It will give you a preview of your design, helping you to make small changes beforehand. You can also better decide on the overall length of your project this way.
Since you’re learning how to bead for beginners, shorter-length projects with a simple design would be best for you. Laying out your design plan will also speed up your beading process.
Find a tutor for this topic
Once you’ve planned out your first project, it is time to learn the basic beading techniques. This section of our guide on how to bead for beginners will discuss the easiest ways to get started.
Bead stringing refers to threading beads onto a nylon thread, ribbon, cord, leather string, or flexible wire. You can easily make necklaces, keychains, earrings, or bracelets by threading your beads this way.
The key to successful bead stringing is to choose the right thread. Selecting a weak thread won’t support your beads, causing breaks, a distorted shape, or twirls. You should test different wires and choose the best one for your beading project.
Let’s run through a straightforward bead stringing technique step-by-step.
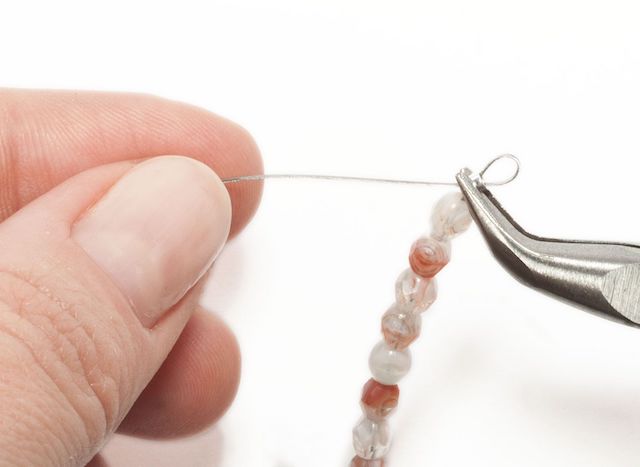
When done, you’ve successfully beaded your first project and learned how to bead for beginners using the easiest beading method.
Bead wirework uses a firmer single strand of wire that holds the shape of the jewelry. These wires create firmly structured and expressive pieces without the need for any advanced tools. Bead wirework can also create bracelets, tiaras, beaded decorations, or chain maille work.
The key to successful bead wirework is to choose the correct type of wire. Depending on the nature of the project, you can select a dead soft wire, soft wire, half-hard wire, or full-hard wire. This section of our guide on how to bead for beginners will detail the steps to execute the wirework technique.
With this creative skill, you have successfully determined how to bead for beginners and beaded your first pr
So, you’ve now learnt how to bead for beginners and are ready to start new projects. Here are a few projects you can try with your newly acquired beading techniques.
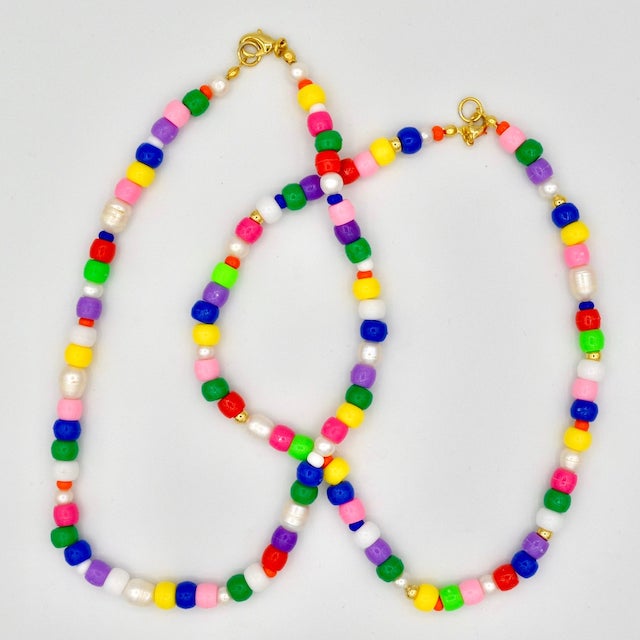
Beading necklaces is the perfect project to start for beginners. You can add a lot of different beads without having to worry about the length. In fact, long beaded necklaces look trendy in addition to shorter ones like chokers.
However, if you keep your necklace projects shorter and focus more on the technique at the beginning, it helps to you get used bead stringing to make your necklace. And you can also use big chunky beads for beading long necklace pieces.
Bracelets are a relatively popular project when learning how to bead for beginners. You can use different beading techniques and improvise on the basic ones to create multiple bracelet pieces for yourself.
Both bead stringing and wirework techniques are suitable for beading different bracelets. And an elastic thread would be perfect for a fitted bracelet or an anklet. Using small or medium glass beads on bracelets can give them a charming look.
If you want to perfect your beading technique, you should take a class on how to bead for beginners. This will help you perfect your technique and teach you the jargon used in this hobby.
Benefits of online learning
Taking a 1:1 lesson from an online tutor will help you become familiar with basic beginner skills and more. It’s also a great platform to meet other jewelry enthusiasts.
Lrnkey, an online tutoring platform, offers online tutorials for beginners and advanced jewelry makers. Benefits of online learning is that these one-on-one lessons hosted by expert tutors help you learn everything there is to know about beading.
Jewelry-making demands the knowledge of basic techniques and requires new inspiration. You can search the web and connect with different artists from all over the world and get inspiration from their work. Pinterest is also an excellent resource for ideas.
Beading is a fun and exciting hobby, and there are no right or wrong designs. You can pour your imagination into your jewelry and mix up your beads to create a different project each time.
With this detailed guide on how to bead for beginners, we’ve tried to familiarize you with the supplies and basic techniques. Now you’re ready to enter the world of jewelry-making and try out your first beading projects.


Explore more than 500+ high-income skills
Practice with experienced tutors
Book your first free lessonLrnkey AI Agent
Let’s personalize your support experience.
Are you a robot?