AI Interviews for Screening: Transforming How We Hire
Discover how AI interviews for screening are transforming recruitment. Learn the benefits, challenges, and future of AI-powered hiring.
Create learner account
Lrnkey
2022-02-08Explore more than 500+ high-income skills with highly motivated tutors
Perhaps you exchanged bracelets with your friend when you were young, but have you ever wondered how to make friendship bracelets? There was something special about tying a bracelet to your best friend’s wrist as a sign of your everlasting friendship. And it was always one of the highlights of the summer camp crafts each year.
Perhaps you’re a beginner trying to learn basic string art techniques. Or may you’re a parent trying to teach your kids this fantastic DIY project. Either way, it’s key to know what supplies you need and the best string to use. And understanding the different types of knots and patterns, you can choose from will have you creating friendship bracelets in a flash.
With the multiple options of strings and patterns available, you might feel overwhelmed. But we’ve compiled a brilliant guide on how to make friendship bracelets. And with this guide, you’ll become familiar with this craft in no time.
We cover everything from choosing your supplies to the different patterns you can try out as a beginner. So, let’s dive in and learn how to make friendship bracelets.
Choosing Your Supplies
Making friendship bracelets doesn’t require a whole lot of supplies. All you need is string and masking tape or a clipboard. When braiding your bracelet, you need to attach it to a solid surface to ensure it doesn’t unravel. A clipboard or masking tape would help you do just that.
Choosing the correct supplies is essential while learning how to make friendship bracelets. And using beads or charms can make your friendship bracelet unique and special. But the most crucial element of the bracelet is the type of string you choose.
Selecting the Best String for Friendship Bracelets
There are many types of strings that you can use while learning how to make friendship bracelets. Most strings work perfectly if they are not too thin, thick, or weak.
Embroidery floss is a popular string type manufactured or hand-spun for embroidery or needlework. It is excellent for making friendship bracelets as it’s made from cotton and is six-stranded. The thread is available in various colours and is widely available in the market.
Pearl cotton is another popular kind of thread used to learn how to make friendship bracelets. It is made of 100% cotton and is available as twisted braids, making it easier to handle. You can choose a 3mm or a 5mm thread to braid your bracelets.
Some people prefer using yarn to make bracelets. These are also available in a wide variety of colours. However, they are a little thick compared to the other two types of strings. Also, they might irritate your hand when worn for a long time. People prefer using yarn because they are readily available in the market and can also be found in their homes.
While you can choose any of the three strings mentioned above, I prefer the embroidery floss for learning how to make friendship bracelets. It has the perfect thickness and comes in a wide variety of colours.
Learning the Four Basic Knots
Before you start learning how to make friendship bracelets, you should be familiar with the four basic knots. These knots are common in all the patterns you will learn in our guide later. Understanding these basic knots will help you design your friendship bracelets in no time.
Forward Knot
Backward Knot
Forward-Backward Knot
Backward-Forward Knot
Once you have learnt and practiced the four basic knot techniques, we can move on to the patterns. This is the most exciting part of learning how to make friendship bracelets.
Find a tutor for this topic
There are a few different basic patterns that you should be familiar with. All these patterns will include the four basic knots. You’ll learn a few different designs with our guide on how to make friendship bracelets. And, in doing so, you’ll have gained enough experience to mix, match, and create a unique design for your bracelet.
Simple Braided
Before moving on to the more complex patterns, you should first try out the simple braided bracelet with our how to make friendship bracelets guide. It does not require any knots and is the most straightforward project you can take up as a beginner.
Prepare the Thread
Create the Braid
Candy Stripe Pattern
The candy stripe patterned bracelet is easiest to make while learning how to make friendship bracelets. You need to know the basic forward knot to create this pattern.
Prepare the Thread
Create the Candy Stripe Pattern
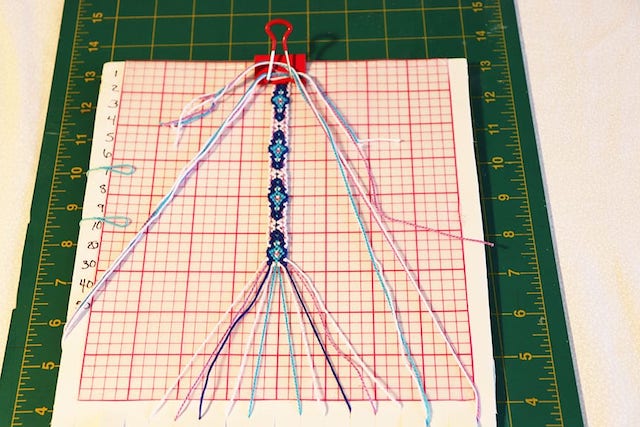
Chevron Pattern
The Chevron bracelet is a little complicated as compared to the first one. However, it unveils a unique pattern, which you should try while learning how to make friendship bracelets. You need to be familiar with both forward and backward knots to create this pattern.
![]()
Prepare the Thread
Create the Chevron Pattern
Knotted Pattern
Knotted patterns form a unique cylindrical bracelet that is fun to create when learning how to make friendship bracelets. You should be familiar with forwarding knots to create this pattern.
Prepare the Thread
Create the Knotted Pattern
Perhaps you want to perfect yourself in braiding advanced friendship bracelets to sell to your audience. In that case, you should look for a professional course on how to make friendship bracelets. You might find a few resources on YouTube or learn through multiple blogs.
However, taking a 1:1 lesson from an online tutor would help you become familiar with the beginner and advanced knotting methods and the different patterns you can try on with them. You can also connect with other braiding and knotting enthusiasts and take inspiration from their work.
Lrnkey, an online tutoring platform, offers online tutorials for beginners and advanced jewelry makers. These one-on-one lessons hosted by expert tutors will help you learn everything about how to make friendship bracelets.
Besides basic knots and patterns, you also need to look for new inspiration to make friendship bracelets. When you are learning and practising how to make friendship bracelets, you can search the web and a few popular social media websites, including Pinterest and Instagram. They will give you a new perspective on the designs you can try out.
Creating friendship bracelets with your kids or on your own is a fun and exciting craft. You can use your vivid imagination to think about battens and knot them together to make a unique bracelet. With this brief guide on how to make friendship bracelets, we have tried to make you familiar with the supplies needed and the basic bracelet patterns.


Explore more than 500+ high-income skills
Practice with experienced tutors
Book your first free lessonAre you a robot?