People have been learning how to make wire jewelry for ages. However, it has gained more popularity in the last few decades, mainly because of its endless creative options.
Beaded jewelry uses a wire gauge due to its strength, natural beauty, and flexibility. With the wide variety of wire and technique options available, you might be unsure about where to start. Selecting your wire gauge and type is the first step. After that, it’s about learning and practicing the various wire jewelry techniques to create your first work of art.
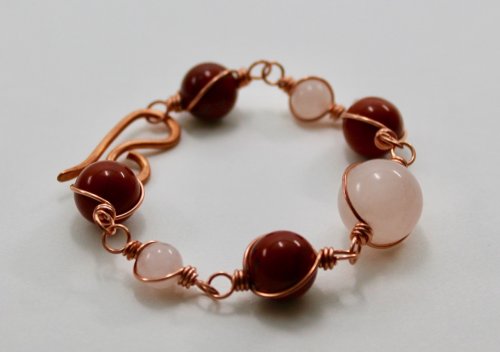
Tips on How to Make Wire Jewelry
![How to Make]()
With our guide on how to make wire jewelry, you’ll learn all the basic wire jewelry techniques. You’ll also understand the wire gauges and which one is the best for your situation.
Picking the Right Wire Gauge
Before you start learning how to make wire jewelry, you need to understand the basics of wires and their types. Once you know the different wire gauges available in the market, you can analyze which one best suits your jewelry-making needs.
A gauge is a unit of measurement which analyzes the diameter of a piece of wire. Unlike the standard metric system, the gauge works a little differently. The larger the gauge number, the thinner the wire is. The thickness of a gauge is inversely proportional to the number of times a wire has passed through the draw plate. The more times it passes through the plate, the thinner it becomes.
One of the finest gauges used for making jewelry is the 32-gauge, used for intricate work like wire weaving or bead crochet. Then comes the 28-gauge wire, one of the most popular among jewelry makers. It is slightly thicker and stiffer used to create no-solder resin bezels. While learning how to make wire jewelry, you will know how to use these for wire weaves.
The 24-gauge jewelry wire is a good fit for beading projects. It fits perfectly through gemstone beads and is flexible and durable enough to make an excellent wire-wrapped loop. A 20-gauge jewelry wire is a versatile wire size that is sturdy enough to hold its shape while making handmade chains, ear wires, and jump rings.
A 16-gauge jewelry wire works well for necklaces, bracelets, and rivets. In contrast, a 14-gauge wire makes robust components like bangle bracelets.
So, when you’re learning how to make wire jewelry, you should maintain versatility in your project. You can do this by ensuring you have wires in different thicknesses when you gather your gauges. You’ll choose the size based on the project you will be taking upon.
Selecting the Type of Wire
Once you have decided the thickness of your wire gauge, you now need to choose the type that is suited best for shape retention. While softer wires are much easier to bend, they do not hold their shape perfectly. Again, the type of wire you will use will depend entirely on your project.
Dead soft wires are best for delicate work and offer a lot of flexibility. On the other hand, a full hard wire is difficult to bend and can snap easily. But it is the best for retaining shape. The half-hard wire is the most popular type of jewelry wire since it is easy to bend and maintain its shape.
Most of the time, when you are working on a jewelry piece, you will require a mix of thicknesses and types as well. For instance, if you are making a bracelet, you might need a dead soft 28-gauge wire for delicate beading and a 10-gauge wire for a heavy-duty clasp. While learning how to make wire jewelry make sure you have different wire gauges handy.
Gathering Your Supplies
Apart from wire types, you will also need a few other accessories to make your jewelry a little more charming and elegant. You will require jump rings, ear wires, clasps, and different types of beads to make your jewelry piece more beautiful. Additionally, wire cutters, a chain-nosed pliers, and a round-nosed pliers will also come in handy while making wire jewelry.
Gathering all your supplies before you start with our guide on how to make wire jewelry will make your process much more exciting and less time-consuming.
Basic Wire Jewelry Techniques
You’ve chosen the different wire gauge sizes and gathered the rest of the supplies and tools. Now, it’s time to delve into the basic techniques and learn how to make wire jewelry.
Find a tutor for this topic
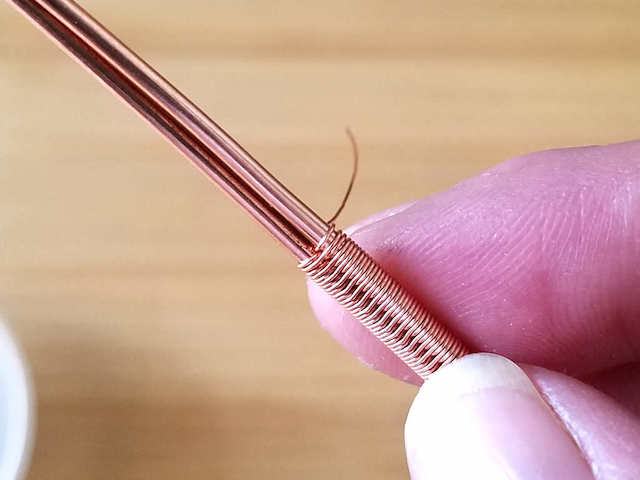
Basic Wire Links
![Basic Wire Links]()
Wire links, also known as connectors, are used by designers in handmade chains, danglers, and extenders. The first technique in understanding how to make wire jewelry guide is forming a basic wire link. Wire links bear the load of the entire jewelry piece and would thus require a wire which is a little thicker.
Prepare the Wire
- Select a 20-gauge half-hard wire from your supplies. A half-hard wire can help improve the strength of your connectors.
- Take the end of the wire you will be working with, and snip off a small piece from the front edge with the help of a wire cutter. It will leave your wire gauge with a flat end. This flat end will make your loop.
Make the Loop
- You can also make the loop while the wire is still attached to the bundle. However, if you still decide to cut a certain length of the wire, make sure it is long enough for your link.
- Using your round nose pliers, grasp the flat end of the wire between its two ends. If you want a larger loop, you can place the wire at the end of the plier. You can put it on the plier’s nose for a smaller loop.
- While holding the wire securely in place, gently turn the hand holding the wire away from you. Your wire would start wrapping around one of the jaws of the plier. To make a complete loop, you must reposition your plier and twist your wrist again.
- Once you have completed the loop, you will have a ’P’ shaped curve. To center the loop, slightly insert your plier’s nose and pinch the wire towards the base of the loop.
- After centering the loop, use the chain nose plier to close the gap between the wire and the end of the loop. You can do this by gently pushing it back and forth until the hole closes.
Additional Options
- If you want to add extra security and make your loop a little fancier, you can use your chain nose plier to make a 90° bend in the wire. Wind the wire around the loop at least three times. Cut the desired length of the wire with a wire cutter,
- If you want, you can add a few beads to the length of the wire and then make the same loop on the other hand. These wire links would act as fancy connectors in your jewelry pieces. You have now made wire links with the help of our how to make wire jewelry guide.
Wire-wrapped Beads
Wire wrapped beads or pendants act as a beautiful addition to your jewelry pieces. The wire holds your bead securely in place and looks fancy at the same time. While learning how to make wire jewelry, you should try out wire-wrapped beads or gemstones to add a unique touch to your ornaments. It can help if you chose a relatively sturdy wire to create a cage around the bead. It allows the wire to retain its shape easily while holding the bead’s weight.
Choose Your Gemstone and Wire
- To create a basket or a cage, you first need to select a bead or a gemstone you want to add to your necklace. Try using wider beads in the middle and not longer than 2 inches. This would help you create a cage easily.
- Select a 22-gauge half-hard wire from your supplies. Measure about 8 inches of the wire and cut two equal lengths using a wire cutter. Cut them from the flush side to get flat, clean cuts.
Wire-wrap the Gemstone
- Place both of your wires in an X position, making them intersect right in the middle. Hold the wires where they cross, with your thumb and index finger of each hand. Start twisting the wires by turning your hands in the opposite direction. Give them five firm twists.
- Once you finish twisting, pull the four legs of the wire straight and parallel to each other. They will be at a 90° angle from the twist, forming an ’H.’
- Now place the twisted part of the wire flat against your bead. Try to place the wire halfway between the top and the bottom of the bead. After positioning the beads, gently press the wire legs down towards the bead’s surface, following its shape.
- Take the two lower legs of the wire and twist them five times at the very opposite end of the bead. Push this new twist to lie flat against the surface of the bead.
- Now, take the other two legs of the wire and twist them five times, and lay it flat on the bead, as before.
- Keep repeating this procedure on both sides until the entire bead is contained. Your bead should now look like it is in a wire cage, with four loose wires on its top.
Finish Off the Top
- Now select a pair of wires and twist it five times. However, do not lay them flat on the surface. Instead, they should be pointing up.
- Take the other two free wires, one at a time, and wind them slowly and carefully, making a strong, tight coil. Wind them around the final twist five times until you have reached the top. Snip off the excess wire lengths.
- Straighten the wires at the top of the final twist to form a T shape. Place a pencil in the middle and wrap the wires around in the opposite direction. This will create a complete, round loop.
- Tightly wrap the wire ends around the twist. You now have a wire-wrapped bead pendant ready to be attached to your jewelry ornaments, with our how to make wire jewelry guide.
Basic 2-Wire Weave
A wire weave is created by looping a thin wire around a heavy wireframe. This wiring technique is a little advanced when we talk about how to make wire jewelry. However, this technique offers a unique style and look to your ornament. Choosing a medium, thick, and fine wire for this jewelry technique would be best.
Preparing the Wire
- Select two wires. One would be a 20-gauge half-hard wire, and the other would be a 26-gauge dead soft wire. The hard wire would make the backbone of the weave, on which you will wrap the thinner wire.
- Cut two pieces of the 20-gauge wire of approximately 3.5-inch length. Cut the thinner wire to about 12 inches long.
- Lay the two medium wires parallel to each other. To better grip, tape down the two ends of the medium wire using masking tape.
Making the Weave
- Now lay the thinner wire over the end of the warp, which is the thicker wire, to start weaving, and using a nose plier, wrap the thinner wire once on the bottom warp, away from yourself. When your coiling is complete, the weaving wire should be at the front of the wrap wire.
- Place your weaving wire behind the upper wrap, and wrap the wire towards you, twice.
- Now bring the weaving wire behind the button warp and again wrap the wire twice, away from you.
- Continue wrapping the wire on both warps, once towards you and then in the opposite direction. Repeat this step until you have achieved the desired length.
Finishing it Off
- Once you are happy with the weaved length, cut off the tails of the warped wire. Pinch in all the sharp edges securely with the help of a nose plier.
- Use the woven wire to incorporate it into your jewelry pieces like a pendant, bracelet, or ring. You can also add a few beads or stones to make it look more pretty. You have created a stunning 2 wire weave with the help of our guide on how to make wire jewelry.
Take a Class: Learn How to Make Wire Jewelry
![Wire Jewelry]()
Making wire jewelry is a fascinating hobby that you can turn into a professional jewelry business. If you want to scale up your skills, you can take up an advanced course on how to make wire jewelry.
By taking a 1:1 online course with a tutor, you would be able to learn and practice your jewelry-making skills more effectively. You will also get opportunities to connect with a community of jewelry makers and take inspiration from their projects.
Lrnkey, an online tutoring platform, offers online tutorials for beginners and advanced jewelry makers. These one-on-one lessons hosted by expert tutors will help you learn everything about how to make wire jewelry.
When creating interesting patterns using wires, you might need a little more inspiration and a fresh outlook. You can search the web for inspiration. And you can incorporate these ideas into your wire jewelry.
Creating wire jewelry is a fun hobby that you can try out on a girl’s night with your friends. In our brief how to make wire jewelry guide, we have tried to familiarize you with different wire gauges and methods to style them into jewelry items.
FAQ
What supplies do you need to make wire jewelry?
To make wire jewelry you’ll need the following supplies:
- Clasps
- Wire of varying widths
- Wire cutters
- Needle nosed pliers
- Beads or gemstones
What is the best way to learn to make wire jewelry?
The best way to learn to make wire jewelry is by booking a 1:1 personalized lesson on Lrnkey. By taking a 1:1 online course with a tutor, you would be able to learn and practice your jewelry-making skills more effectively. You will also get opportunities to connect with a community of jewelry makers and take inspiration from their projects.
How do you make wire jewelry for beginners?
To make wire jewelry for beginners, simply gather supplies like wire, wire cutters, pliers, and any beads or gemstones you wish to use. Then add a clasp to one end of the wire so that your beads won’t fall off. Next, you can bead or weave the wire in a pattern until the desired length is reached. Finally, loop off the other end of the wire so that your clasp can connect with it. Your jewelry is now ready to wear.
What jewelry can you make with wire?
You can make many kinds of jewelry with wire including:
- necklaces
- bracelets
- earrings
- pendants
What is the strongest wire for jewelry making?
The strongest wire material for making jewelry is stainless steel and plated stainless steel wire. The width of the wire also makes a difference, the ticker the width of your wire, the heavier and larger your jewelry will be, but it will generally be stronger too.