Why Online Education is Essential for Leaders
This article will discuss why online education is essential for leaders and how it can benefit them.
Create learner account
Lrnkey
2022-02-08Explore more than 500+ high-income skills with highly motivated tutors
Wouldn’t it be great to know how to make a centrepiece for your next dinner party? A well-planned centrepiece can elevate your entire room and make your home feel instantly festive and happy. Be it flowers, fruits, or just plants, centrepieces are incredibly attractive and inviting.
There are a few simple steps while learning how to make a centrepiece. You need to plan out your entire project, gather all your supplies, and choose the technique you find the easiest. Try making silk or a real rose topiary if you are thinking of making a dome-shaped centrepiece. Candles and themed centrepieces also look good at your centre table.
Centrepieces don’t always have to be too complicated or expensive. At times they can just be easy, fun, and stylish. Instead of looking for the perfect centrepiece for your table this holiday, you can make one of your own. Make your DIY centrepiece with readily available things available in your home or at your local craft store.
Making centrepieces can be a fun experience, especially when you do it with your family. Once you learn how to make a centrepiece, you’ll be able to create a variety of pieces to suit any occasion. Whether you plan a get-together with friends or host a holiday meal, you can create a beautiful centrepiece without much effort.
So, let’s dive in and learn how to make a centrepiece.
Before you can start decorating your table with a piece, you need to plan out your project. You will need to figure out which type of centrepiece you want for your room. If you are decorating it for a holiday, you can go with a floral or a candle decoration. They usually match and alleviate the aesthetic of your room.
You can also go with a themed centrepiece for different holidays and festivals. You can create a fruit centrepiece with candles for your seasonal decorations.
No matter which type of centrepieces you want, planning it out in your mind will help you gather the right supplies. When learning how to make a centrepiece, you need to be creative with your decorating style and ideas. Knowing the colour theme that looks best in your dining space will help you set your decorative items in a more visually pleasing way.
Once you’ve planned your project and gathered all supplies, it’s time to learn the different ways you can decorate your centrepieces. This section of how to make a centrepiece will discuss the easiest ways to make a decorative piece for your home.
Roses are a great addition to the table, irrespective of the occasion. They elevate your room, and with a silk rose topiary, you don’t have to worry about watering them every day. You will need a Styrofoam ball, glue gun and a bunch of silk roses. You’ll also need a candlestick and a pair of wire cutters to get started.
This section of how to make a centrepiece will discuss an exciting way of decorating your home. Follow these steps to make silk rose DIY centrepiece:
Find a tutor for this topic
There is nothing more fascinating than a blossoming rose. They fit perfectly for all occasions and holiday decorations. To create a real rose topiary, you will need aqua foam, garden shears, and a bunch of fresh roses. This section of how to make a centerpiece will discuss an exciting way of decorating your home.
Candles change the aura of the room and lighten it up. Creating a candle centerpiece will make your room look a little classier and more elegant. It is the perfect setup for events and holidays. Here are a few candle setups you can try out while learning how to make a centerpiece.
To create a unique look for your table, you can choose different-sized candles and place them in an aesthetically pleasing manner. Or you can select a uniform look with different coloured candles. It all depends upon your mood and the event.
When choosing colourful candles, try and decide the overall theme of your room. Picking candles out randomly might lead to wastage. Think about which colours will work together and complement each other.
The setting of your table will also vary from the type of candles you choose. If you want your candles to sit high on the table, you should purchase tall and thin candles. If you prefer them to sit low on the table, you should buy short and wide candles.
Candle holders give an antique and rustic feel to your house. If you are trying to go with this look, you should buy candle holders from a vintage or a thrift store. Choose the holder that will best complement your candles. You can also choose to customize your candle holder by wrapping it into tulle or lace. This is an exciting way to decorate your home while learning how to make a centrepiece.
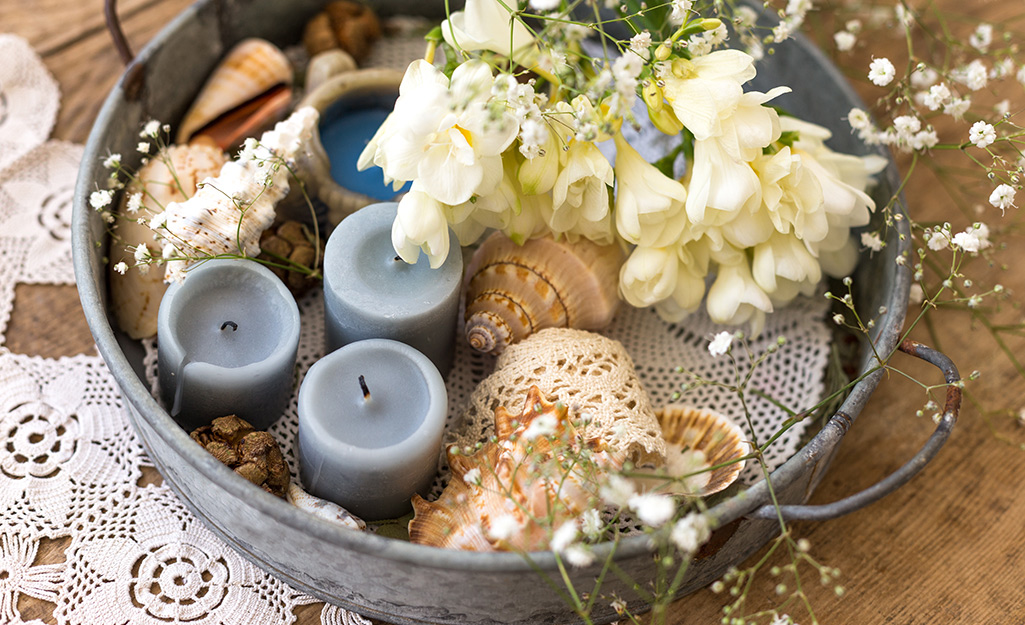
With a floating candle arrangement, you will be able to incorporate both flowers and candles into your centrepiece. For this, you will need a wide container, a bunch of fresh flowers, food colouring, and floating candles. This section of how to make a centrepiece will discuss a unique way of decorating your home.
Themed centrepieces can help you alleviate the mood of your house. Before you can learn how to make a centrepiece, you need to plan out the theme for your home. For instance, if you are decorating your house for Christmas, you can choose a simple red, green, and white colour theme. You can then add elements to your centrepiece accordingly. You can mix flowers, candles, or vases while making a themed centrepiece for your house.
Here are a few themed setups you can try out while learning how to make a centrepiece.
Building a centrepiece based on a specific period is a great way to give a unique twist to your holiday decorations. Here are a few period ideas you can focus on while learning how to make a centrepiece.
Creating centrepieces for your home based on TV shows is another great idea to give a unique twist to your centrepieces. Here are a few ideas you can include while learning how to make a centrepiece based on books or TV shows.
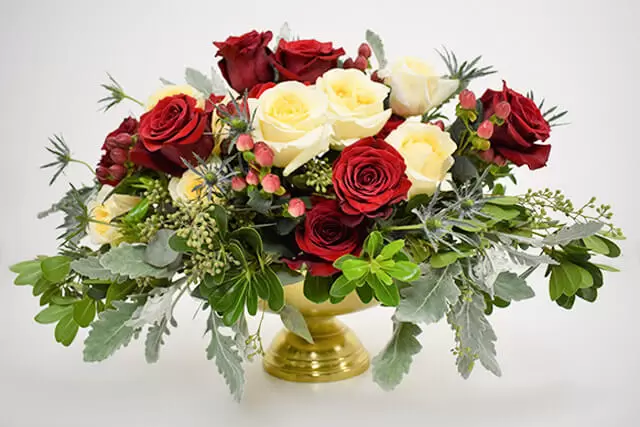
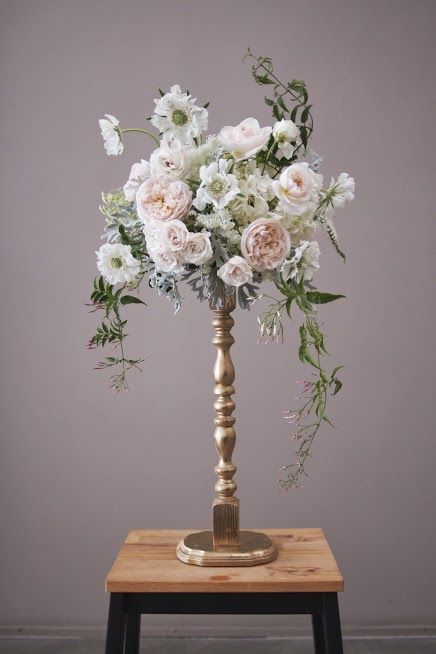 Choosing a colour scheme is one of the most straightforward and aesthetically pleasing ways to create a centrepiece. You can select the scheme for all the decorations in your house and make your piece the central attraction. You can choose an anchor colour and then mix it up with shades and tones of complementary colours. This can help you make beautiful items while learning how to make a centrepiece.
Some of the popular festive colour schemes are
Learning how to make a centrepiece is a great DIY activity to mix your skills with your creativity. If you want to learn a little more about making centrepieces, you can take a 1:1 lesson from an online tutor. They will help you understand all the basic techniques, along with the tips and tricks to kick up your creativity.
Lrnkey, an online tutoring platform, offers online tutorials for beginners and advanced DIY enthusiasts. These one-on-one lessons hosted by expert tutors help you learn everything there is to be decorating a centrepiece for your home.
While making a centrepiece, you might need a little inspiration decorating it. You can scroll through social media applications like Pinterest and Instagram and connect with DIY experts from all around the world. When you learn how to make a centrepiece, you can take inspiration from them and make tweaks to your decoration.
To make a simple centrepiece find some flowers, fake or real, a vase, and some beautiful ribbon. You can place the flowers in the vase and tie the ribbon around it for a quick, simple centrepiece.
To make a centrepiece for a table, find a beautiful bowl or tray, some natural elements like twigs, flowers, and fruits, and candles. Arrange the items within the container in a beautiful way, being careful that any leaves or flammables are out of the way of the candle. Once you light the candle, you’ll have a warm, natural-looking table centrepiece.
To make a centrepiece you’ll need a container to hold the elements together such as a vase or a bowl. Next you’ll need something natural to make the centrepiece look nice like flowers, leaves, berries, fruits, or twigs. You may also want candles in your centrepiece to provide a warm atmosphere around your table. Finally, you’ll want to tie it all together with decorative elements like ribbon.
To make a small centrepiece you’ll need approximately six flowers. For larger centrepieces, you can use up to fifteen in addition to smaller filler flowers such as baby’s breath or foliage.
It only takes a few moments to make a centrepiece. Once you have your supplies gathered and your design planned. Putting the items together takes maybe five minutes. It may take longer if you are gluing items in place, then you should allow for some drying time.


Explore more than 500+ high-income skills
Practice with experienced tutors
Book your first free lessonAre you a robot?