5+ Must-Have Devices for Freelancers
If you are starting your freelance career, then it is great that you are reading our article, as you can learn what type of gadgets you need as a freelancer.
Create learner account
Lrnkey
2022-02-08Explore more than 500+ high-income skills with highly motivated tutors
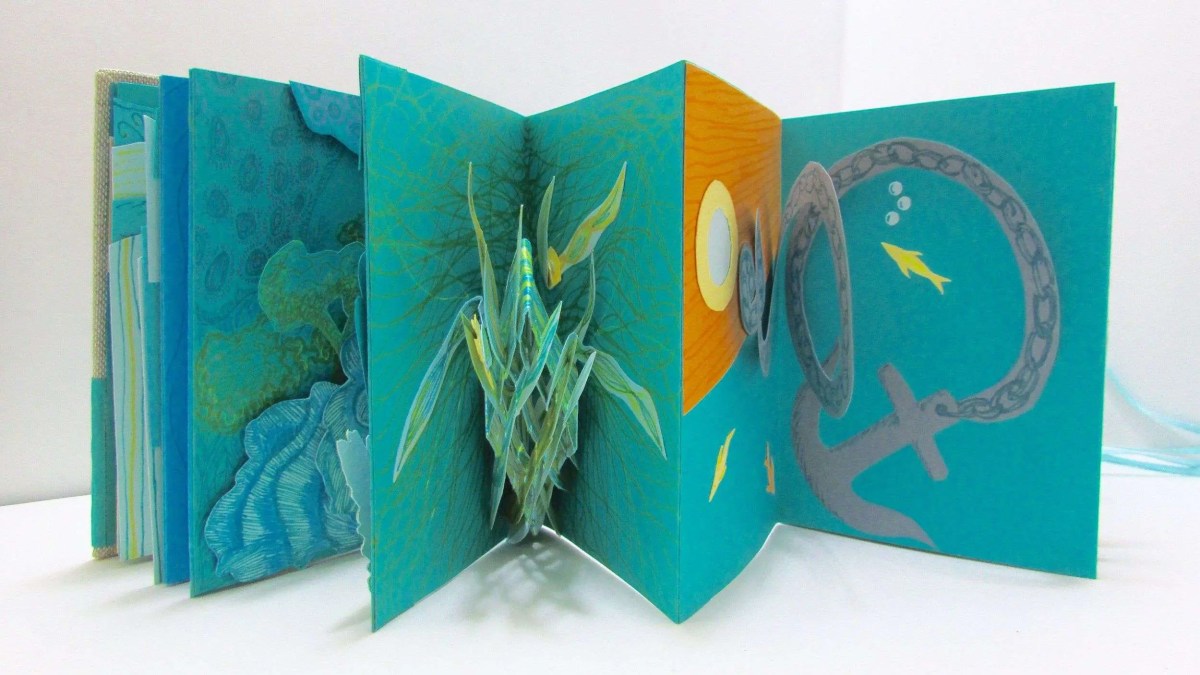
Are you trying to learn how to make a pop-up book? Well, you have landed on the right article. Pop-up books have always fascinated me with the interesting 3D images and creative plot lines. They add an exciting new dimension to your book.
How to make a pop-up book seems like a pretty straightforward question. However, its answer lies in the complication of your book. If you want a simple pop-up book, you can easily do this by planning your plotline and creating 3D elements. You can use a simple box, V-fold, or letter pop-ups to add the 3D element to your book.
If you want to make a simple, exciting book, you need a few materials and 3-4 hours. However, if you’re going to make a 3D pop-up book with multiple illustrations, you will need more planning.
In our article on how to make a pop-up book, we’ll discuss planning your book and gathering supplies accordingly. We will also discuss the different techniques to make it a creative masterpiece.
Before you can learn how to make a pop-up book, you need to plan your plotline. It would be best to decide on the illustrations you want to pop out of your book. You could even create a visualization of your pop-up book using an online flipbook maker!
The first step to planning your pop-up book is to choose an exciting topic. This will depend upon your audience. If you are thinking of making a book for kids, your topic should be kid-friendly. You can try making a plotline around a popular cartoon or create a character of your own.
If you are learning how to make a pop-up book and target adults, you can choose a wide range of topics. Creating a 3D pop-up book on a social issue close to your heart is also a great idea.
You can choose between a fiction and non-fiction book as well. Children usually prefer fiction books with many characters and a little moral education at the end. You can make a 3D pop-up book of a classic folk tale if you choose fiction. You can also create a short story of your own.
Whatever topic you choose, make sure that you do not complicate it too much. When learning how to make a pop-up book as a beginner, try keeping things simple. Once you are familiar with the basic techniques, you can move forward and add as many 3D pop-ups as you like.
Once you have planned your book, it’s now time to gather your supplies. Creating and learning how to make a pop-up book becomes easier when you have everything you need beforehand. The supplies you need would depend upon your project.
You will need a few basic materials while making a 3D pop-up book.
Once you have gathered all your supplies, you should create a small storyboard. This helps you outline your story and decide your 3D elements beforehand. It saves your time and effort.
In this section of the article, we will learn the basic techniques of how to make a pop-up book. Planning your storyline and gathering supplies would help you get your work done faster.
Most people prefer getting their work done in a single sitting. However, I would recommend making your pop-up book in a span of 2 or 3 days. This will help you be more creative with your ideas.
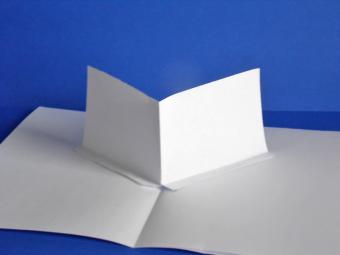
In this section of how to make a pop-up book, we will start with the most straightforward technique. It is one of the easiest pop-up mechanisms to create. All you’ll need is card stock, a pair of scissors, and a scale to get started.
Instead of making all identical rectangles, you can also cut out different sizes. This will give a better 3D illustration of your book. In the first technique of how to make a pop-up book, you learned to make basic pop-ups for your book.
Find a tutor for this topic
Once you have learned to make a simple rectangle or square pop-up, it’s time to spice it up a little bit. In this section of how to make a pop-up book, we’ll learn V pop-ups. These add a little more creativity to your books. All you’ll need is card stock, a pair of scissors, and a scale to get started.
n this technique of how to make a pop-up book, you learned the V-fold technique. You can use this in different book sections and get creative with the pop-up.
The problem with making rectangular and pop-up boxes are they leave a hole in the front. They also limit the appearance of the pop-up. If you want to utilize every part of your book, you might want to attach separate cut boxes. In this section of how to make a pop-up book, we’ll learn to connect separate cut boxes.
All you’ll need is a few sheets of card stock, a pair of scissors, and a scale to get started.
In this technique of how to make a pop-up book, you learned how to make separate pop-ups. You can use this when you want to attach a uniquely-shaped pop-up to your book.

Just like you make square or rectangular boxes, you can also cut a V-fold separately and attach it to your book. In this section of how to make a pop-up book, we’ll learn to connect separate V-folds. Here, you use tabs to stick the folds to your book. These can either be visible, hidden or slotted.
All you’ll need is a few sheets of card stock, a pair of scissors, and a scale to get started.
The best part about attaching a separate cut V-fold to your pop-up book is the freedom of experimentation. You can try out different angles of V or use an asymmetrical V-fold as per your requirement. This will allow you to give a creative touch to your book.
If you are making a pop-up book for kids, adding letters as a 3D pop-up would be a great idea. You can create an educational book out of it, helping children learn the alphabet faster. Alternatively, you can also use it in a fiction book to stress certain action words. In this section of how to make a pop-up book, we’ll learn to create popped-up letters.
All you’ll need is card stock, a pair of scissors, and a scale to get started.
Creating a letter pop-up can make your book enjoyable to read and learn. They are great for action fiction books. You can concentrate on an action word and pop it out of your book.
Once you are familiar with the basic pop-up shapes mentioned above, it’s time to learn a slightly difficult pop-up. In this section of how to make a pop-up book, we’ll learn to create slotted shapes.
The most basic X-design pop-up card has two identical and symmetrical shapes. These shapes are slotted together at right angles. All you’ll need is a few colored sheets of cardstock, a pair of scissors, and a scale to get started.
Slotted pop-ups make your books enjoyable to read.
Creating a 3D pop-up book is a fun task. You get to create an exciting storyline and use your imagination and draw out characters. The pop-up element to the book makes it interesting for both kids and adults. While learning how to make a pop-up book, you can add different pop-up techniques to a single book.
If you want to learn more about how to make a pop-up book, you can take a 1:1 lesson from an online tutor. This will help you be clear with the basic techniques and the small tips and tricks.
Lrnkey, an online tutoring platform, offers online tutorials for beginners and advanced artists. These one-on-one lessons hosted by expert tutors help you learn everything there is about making a pop-up book.
Once you have learnt how to make a pop-up book, you need an outer cover to bind it. You cannot use a traditional cover for your pop-up pages. These covers curl up the centre of your spreads, creating tension in the centrefold. For binding a pop-up book, you can add a little extra space between the pages.
These pages can also be bonded together by adding extra hinges to the spine of your book cover. This helps you bind your pop-up book without creating tension at the centre. While binding the book, make sure that the cover is sturdy.
Pop-up books are a combination of art and science. You need to be creative to create illustrations and set a plot for your book. On the other hand, you need a little science to attach pop-ups to your book. They’re also often associated with origami. This is because they both involve paper folding.
However, these creative and interesting books rely on glue and a pair of scissors. They use a thicker card stock material to retain the shape of pop-ups. Just by making a few changes to the mechanism, you can create different types of pop-ups for your 3D pop-up books.
Pop-up books usually use heavy material paper. This helps to keep hinges in place and shape. The heavy gauge paper is used to make all the movable elements of your pop-up book.
While learning how to make a pop-up book, you can use a heavy board cover for the front and back of your book. Make sure you use good-quality glue to attach these pop-up mechanisms to your pages.
While the materials you need would depend upon the type of pop-up you want to create for your 3D book. When you learn how to make a pop-up book, you can gather a few basic materials for your project.


Explore more than 500+ high-income skills
Practice with experienced tutors
Book your first free lessonAre you a robot?