What Is B2B eCommerce? Definition, Types, Examples, Benefits
Discover B2B eCommerce: learn about its definition, types, benefits, and examples. Explore how businesses streamline operations, reduce costs, and expand globally.
Create a student account
Lrnkey
Feb 18, 2022Explore more than 500+ high-income skills with highly motivated tutors
What if there were a guide on the top 5 ways to make jewelry for beginners? Wouldn’t that be a great resource as you start your jewelry-making journey? Well, you don’t need to dream about it because that comprehensive guide is right here.
Discovering how to make jewelry for beginners is easier than you think. In fact, there are 5 jewelry-making techniques that are easy to learn and execute. These include beading, polymer clay, resin, wire, and friendship bracelet jewelry. Understanding how to choose your materials and which tools to use is half the battle. After that, it’s all about practice.
Humans have been adorning jewelry pieces for thousands of years. Perhaps it’s the wooden and brass pieces worn by our ancestors. Or maybe it’s the new wired or clay jewelry that’s become popular in the past decade. Irrespective, wearing ornaments has always been a part of human culture.
Making your jewelry can be art therapy for you, allowing you to bring out your creative side. From earrings to anklets, there are various ways you can create stunning jewelry pieces at home. If you’re looking to add a unique touch, consider presenting your handmade creations in custom rigid boxes for jewelry.
Much information is available on the web and social media websites to help you understand the basics of jewelry making for beginners. All this information might get a little overwhelming and confusing if you have just started exploring your creative jewelry-making side.
This article will discuss the top 5 ways to make jewelry for beginners and some of the projects that would be perfect for your first try. And we’ll delve into the essential tools and supplies you’ll need to get started. So, let’s dive into the basics of jewelry making for beginners.
Before making your jewelry pieces, you need to plan your project and decide which ornament you want to try at first. Next, you will need to plan out your design.
While going with the flow might suit some people, it is always best to prepare your layout and gather your supplies accordingly. This will accelerate your speed while making your jewelry pieces and ensure that you have everything ready at the stretch of your hand.
You might not know which design would suit your jewelry piece when starting. For this, you can use the internet. You can search Pinterest and Instagram for inspiration and connect with the people of the jewelry-making community.
Getting inspired before creating your unique design is always perfect. Additionally, when you connect to other jewelry makers, you learn from their experience and understand their creative processes.
Once you have planned out your jewelry design, it is time to implement it by learning the top 5 ways to make jewelry for beginners.
When learning how to make jewelry for beginners, you will come across a wide variety of techniques that you can try out. However, first, you will need to decide what type of jewelry you want to make for your first attempt. A few techniques work best for customized earrings like resin jewelry. For rings that are size-specific, you can use the wire jewelry method.
Here are the top 5 ways to make jewelry for beginners.
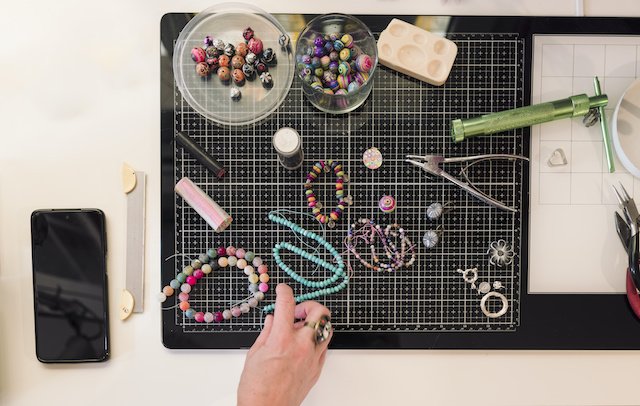
Beading is a simple technique to create stunning jewelry pieces for yourself. While you can make almost any ornament with beads, this technique is perfect for making anklets, bracelets, and neckpieces. Before you can start beading, you will need to learn more about the bead styles and the best materials you should choose for your project.
Beads are an essential part of this jewelry technique. You need to pick the correct bead size and material for your project. Otherwise, you might end up with a boho necklace even if you wanted something chic and delicate.
A mix of glass, wood, and pearl beads in different colours and effects, would be perfect while learning jewelry making for beginners. These beads are durable and easy to manage.
When it comes to beading size, you should prefer buying 4mm, 6mm, and 8mm beads as a beginner. These medium-sized beads won’t be challenging to handle and can be the perfect fit for almost all types of projects. As you advance and learn more about this technique, you can start trying smaller beads for a delicate look.
While there are a variety of techniques to practice, we will discuss the easiest and the most popular bead stringing technique. When you are learning how to make jewelry for beginners, using a string and a couple of beads would be great.
Find a tutor for this topic
Making jewelry pieces out of polymer clay is another exciting hobby. It is one of the best techniques for jewelry making for beginners. This beloved modeling clay is known for its versatility, flexibility, and simplicity. While you can make almost any jewelry item with polymer clay, this technique is better for necklaces, earrings, and pendants. Before you can learn how to make jewelry for beginners with polymer clay, you need to know more about the required supplies.
To make your clay jewelry, you need to choose a polymer clay that is soft enough to knead with hands and firm enough to retain its shape. A few brands offer durable polymer clay perfect for making jewelry pieces.
Premo Sculpey polymer clay has a firm and durable texture. It can be easily kneaded and mixed and is available in a wide variety of colours. Kato Polyclay is another famous brand that a jewelry artist started. The clay has a non-sticky formula and can be easily blended. While learning jewelry making for beginners, you can start with the Fimo Professional polymer clay. It has a non-sticky and flexible texture that quickly creates jewelry and decorative items.
In addition to polymer clay, you will also need parchment paper, a baking tray, a rolling pin, super glue, cookie cutters, and a craft knife.
Once you’ve gathered your supplies, you can jump right into the process of preparing your clay and then rolling it out to make jewelry pieces. You can start with this fascinating technique since you’re learning how to make jewelry for beginners

Making friendship bracelets with strings was the highlight of my childhood. It is one of the most straightforward techniques for jewelry making for beginners. You can also use the stringing method to create friendship bands for making anklets. Before you start making friendship bracelets, you need to learn more about the string type and texture required for the process.
When making a friendship bracelet, the essential element is the string. It would help if you chose a string that is not too thin, thick, or weak. The three most common types of yarn can be used. Embroidery floss is excellent for making bracelets, as it is made from cotton and is six-stranded.
You can also use pearl cotton or a 100% cotton strand available as twisted braids. It makes them easier to use without any tangling. Some people also prefer using yarn that is readily available in multiple colouYour First Projects rs. However, it can be too thick and a little uncomfortable due to its slightly rough and warm texture.
I prefer using either embroidery floss or pearl cotton strand for making friendship bracelets. Besides strings, you also need masking tape or a clipboard to hold your string to a surface and beads or charms to make them look pretty.
While you can use many techniques to make friendship bracelets, we will discuss the easiest and the most popular candy stripe pattern method. While you are learning how to make jewelry for beginners, you can use this technique to braid your bracelets or anklets.
Wire jewelry involves creating jewelry pieces with one or more wires. This technique has been around for centuries and is one of the most popular homemade jewelry styles. This unique technique is relatively easy to interpret while learning jewelry making for beginners. Before making ornaments out of wire, you should first learn about the essential supplies and decide the best wire gauge for your jewelry piece.
Jewelry wires come in a wide variety of thicknesses and types. Gauge is the unit of measurement for wires. The larger the gauge number, the thinner your wire is. Jewelry wire can be as thin as a 32-gauge wire and as thick as a 14-gauge wire.
Which wire you will choose will depend upon your project. If you want to deal with delicate beads and wire weaves, you should select a 28-to-32-gauge wire. However, if you’re going to weave your wires and need strong support, you can choose a size between 14 and 20. When you learn how to make jewelry for beginners, you should use a wire size between 20 and 24. It is best suited for almost all projects.
Besides wire, you would also need cutters, nose pliers, jump rings, or ear wires to complete your wire jewelry piece.
When it comes to making wire jewelry, there are a few techniques that you can use to create stunning pieces. Here we will discuss one of the most creative techniques: two-wire weave.
You must select two types of wires. One would be a 20-gauge half-hard wire, and the other a 26-gauge dead soft wire. The hard wire should be the backbone of your weave, whereas the soft wire will create the weaving effect.
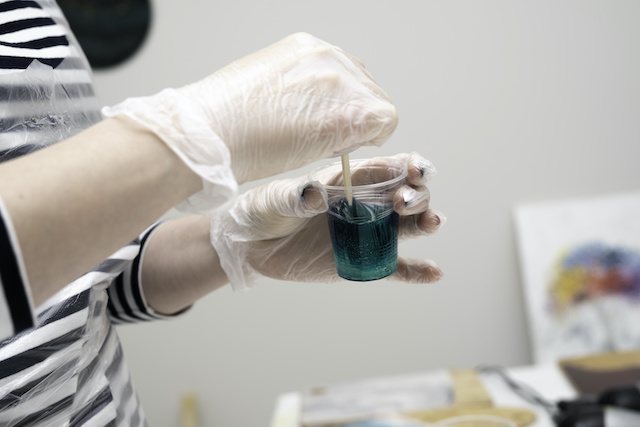
Resin jewelry has become quite popular in recent years—this chemical compound is made from resin and hardener. When you mix both these liquids together, they get cured and solidify.
Resin is for making creative jewelry pieces. It is perfect for making pendants, earrings, and rings. Before making resin jewelry, you should learn which resin would be ideal for you and what other supplies you require.
When we talk about casting resin, three varieties are available in the market. You can either choose epoxy, UV, or polyester resin. Epoxy resin needs to be mixed with a hardener in an appropriate proportion to achieve the desired results. It leaves behind a beautiful, crystal-clear surface after hardening up.
Using UV resin is more accessible than the epoxy one. You do not have to mix any hardener since it cures within minutes. However, it can only cast thin layers and is unsuitable for large jewelry ornaments. Polyester resin, on the other hand, requires a mix of hardeners. However, it leaves behind a cloudy surface, is toxic, and is inappropriate for jewelry designs.
Besides resin, you’ll need sandpaper, molds, a measuring cup, toothpick, glove, respirator mask, and safety glasses.
Once you’ve gathered all your supplies, you can jump right into the process. Following the below steps will set you on the right track to learning how to make jewelry for beginners.
Making jewelry at home can be relaxing, fun, and an addictive hobby for you. While you are learning how to make jewelry for beginners, there are a few tips that you should always keep in mind, no matter which technique you use.
The best part about jewelry making is that you have many options to choose from. While learning how to make jewelry for beginners, you might get tempted to master more than one technique. Our best advice is to try a few methods that interest you the most, and then choose one and master it to perfection. Once you have learnt a technique, it would be easier to understand a new one.
Whether you make your jewelry pieces through resin or beading, there are a few basic skills that you should master with time. Working with jump rings is one of them. Almost all jewelry types will require you to attach a jump ring to the hole with the help of a nose plier. You should also know how to create a simple wire loop with a plier.
Your jewelry-making process will become perfect and effortless once you invest in good-quality tools. Borrowing wire cutters from your home toolbox would not give a perfect finished edge to your wire. It would be best to buy some essential tools you’ll require no matter which technique you use, like wire cutter, nose pliers, jump rings, and metal stamps. These tools might feel like a considerable investment initially, but they more than pay for themselves in the long run.
When you are learning how to make jewelry for beginners, the first thing you should master is to keep your workspace clean. A cluttered workspace would lead to mishaps and would waste your precious time.
Additionally, if you buy good-quality tools and scatter them at places all around the house, they will get blunt soon. It would help if you keep your supplies and your tools organized. You can use inexpensive bins, baskets, or drawer dividers to keep your supplies in place. You can also label your boxes with the help of sticky notes.
Like every industry has its jargon, the jewelry community also uses specific wording. And you should be aware of the lingo if you want to be a part of the larger group. You should know basic terminology, like the name of specific tools and the supply materials you will use.
You should also be familiar with the measurement scale used in the jewelry-making technique. Knowing your craft is the key to learning all the advanced skills.
Jewelry making is all about exploring your creative side. Don’t be afraid to try out new designs or do stuff differently than others. The more you experiment with your design, the better you will get at your craft. Keep trying something new or change a pattern to reflect your taste better.
So, you have now learned the top 5 ways to make jewelry for beginners and are ready to try your hand at some exciting jewelry pieces. I would advise you to start with something easy and simple before you advance to a more complex jewelry style. Here are a few projects you can try with the jewelry-making techniques mentioned in the article.
You can make a necklace using beading, polymer clay, wire, or resin technique. This jewelry piece has the advantage that it can be made as long or as short as you want. Creating a necklace while learning how to make jewelry for beginners can be your perfect first project. You can even combine two techniques to make a more complex neckpiece. For instance, you can bead your necklace and add a resin pendant to it.
Another excellent starter jewelry project is earrings. You can make beautiful earpieces by using any technique. The best part about earrings is that you can showcase your creativity and make some tweaks to look more attractive. Resin and polymer clay earrings have been in trend for the past decade. You can even add real flowers to your resin mould and create stunning pieces.
Bracelets or anklets have been in trend for almost a century. You can use wire, beading, or stringing techniques to make beautiful bracelet pieces. Using memory wire and adding beads, you can create a piece that is easy to wear and style.
You can easily make rings using the beading, wire, and resin jewelry technique. Rings are much more straightforward projects than necklaces. They allow you to focus more upon the basic techniques rather than the design. The best part about making rings is the opportunity to practice more and, thus, unleash your creativity.
Jewelry making is a fun and exciting hobby for a few people and a passion for others. You can sit in your workspace and enjoy this craft to its fullest.
With the wide availability of the internet throughout the globe, you can connect with professional jewelry makers and online tutors. This will help you gain more exposure in the community.
When you learn how to make jewelry for beginners, you might reach a creative dead end and require some inspiration. You can connect with jewelry experts on Pinterest or Instagram and take inspiration from their profiles.
You should always add your designer touch to every piece you design and focus more on perfecting your basic skills and then use them to learn more advanced techniques.
If you want to learn all the tips and tricks, you should apply for a more professional course and learn jewelry making for beginners.
By taking a 1:1 lesson with an online coach, you can make sure to learn the basic steps more clearly and work on perfecting your skills. It is also a great platform to contact other jewelry enthusiasts.
Lrnkey, an online tutoring platform, offers online tutorials for beginners and advanced jewelry makers. These one-on-one lessons hosted by expert tutors help you learn everything there is to jewelry making.
Through this comprehensive guide, you’ll have learned the top 5 ways to make jewelry for beginners. And you should have a good idea of how to execute each of these techniques. With these techniques, loads of practice, and a great deal of patience, you will soon realize your jewelry-making dreams.
The best way to make jewelry for beginners is beading. You can make very beautiful pieces without too much technical skill needed. To bead jewelry, simply tie off one end of your string or wire with a clasp, thread beads onto the string in a beautiful pattern until it’s full and then tie off the other end with a clasp.
To make jewelry for beginners you’ll want to get the following supplies:
The best way to learn to make jewelry is to book a personalized 1:1 lesson on Lrnkey. Lrnkey, an online tutoring platform, offers online tutorials for beginners and advanced jewelry makers. These one-on-one lessons hosted by expert tutors help you learn everything there is to jewelry making.
To make jewelry for beginners, follow these steps:
Get your supplies. Plan out what kind of jewelry you want to make and your technique. Book a lesson with Lrnkey to get an expert’s help making a beautiful piece. Learn and make your jewelry during your lesson.
Making jewelry yourself doesn’t have to be expensive. There are affordable options to purchase beads and supplies. You could also reuse beads or pieces for jewelry that you don’t wear anymore to upcycle old jewelry into something new.


Explore more than 500+ high-income skills
Practice with experienced tutors
Book your first free lessonLrnkey AI Agent
Let’s personalize your support experience.
Are you a robot?