Anyone who’s tried their hand at paper folding can tell you it’s easy to learn to make an origami crane.
Making a paper crane is the perfect DIY project for adults, teenagers, and children alike. The origami crane has a longstanding reputation in Japanese culture. It’s one of the most popular and classic origami models, requiring few materials and little skill. An ancient Japanese legend popularized it. And Sadako Sasaki, whose story Eleanor Coerr based a children’s book on.
Whether you’re new to paper folding or have always wanted to create a paper crane, you’ve come to the right place.
Let’s learn to make an origami crane!
History of the Origami Crane
The origami crane is famous both in Japanese culture and around the world. Its Japanese name is orizuru, which means folded crane.
It borrowed its design from the Japanese red-crowned crane. This crane appears in Japanese mythology as "Honourable Lord Crane". And it’s believed to carry souls up to paradise on its wings.
Another reason for the crane’s popularity is an ancient Japanese legend. It’s said that the gods will grant anyone who folds 1000 cranes ("senbazuru" in Japanese) a special wish. This number is significant because cranes are thought to live for a thousand years.
While it’s believed it can grant you a wish, some beliefs state senbazuru grants happiness, and eternal good luck.
The story of a young Japanese girl named Sadako Sasaki also popularized cranes. Twelve-year-old Sasaki, who developed leukemia after the atomic bombing of Hiroshima during World War II, started making cranes during her hospitalization. She aimed to make 1000 cranes for the gods to grant her a wish.
Eleanor Coerr fictionalized Sasaki’s story in the children’s book "Sadako and the Thousand Paper Cranes". In this version, Sasaki only folded 644 cranes before passing away. Her classmates then folded the remaining 356 cranes in honour of her memory.
In reality, Sasaki finished making 1000 cranes. However, after her wish wasn’t granted, she continued making more. According to her family, she made about 1400 cranes.
Today, people usually gift those seriously ill with a thousand paper cranes as best wishes for their recovery. Also, the crane is considered a symbol of peace.
Required Supplies
There aren’t many materials and supplies you need to make an origami crane. Given the simplicity of the model, it’s an inexpensive project.
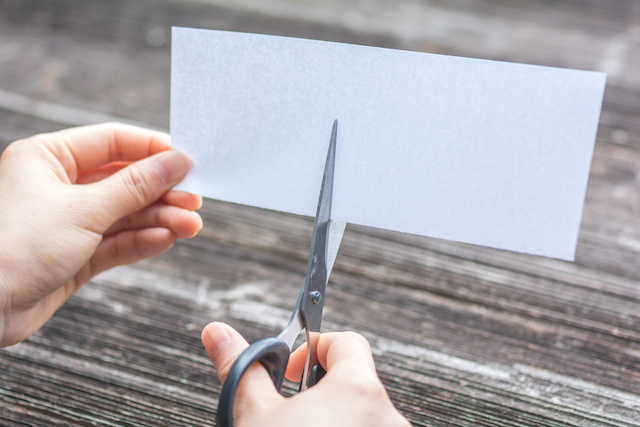
All you need is a square piece of paper and nimble fingers. Preferably, use origami paper, as this is easier to fold than thick paper.
Large pieces of paper are best to learn to make an origami crane. This is because the smaller they are, the more skill is required.
Also, we advise beginners to start with solid colored paper. If you use patterned paper, it can be harder to see the creases when folding. Once you learn to make an origami crane and become a pro, you can use paper with various designs.
Now that you know what you need let’s learn to make an origami crane.
Learn to Make an Origami Crane in 4 Phases
![Origami Crane in 4 Phases]()
It’s easy to learn to make an origami crane yourself or with a tutor, like those available on Lrnkey. We’ve put together an easy step-by-step guide below.
Knowing the basic origami folds can make this project a lot easier. However, it’s not mandatory before you build this model. As a beginner, you can pick up on the different folds as you learn to make an origami crane.
Follow these steps to make an origami crane, and if you make one thousand, your heart’s desire may come to fruition.
Find a tutor for this topic
Phase 1: Making a Square Base
This is the foundation of your crane. A square base is also the starting point for most origami models.
It involves a few folds, so pay close attention as you learn to make an origami crane.
Step 1: X Fold
Start with the coloured side of the paper facing up. Fold the paper diagonally, joining the corners, then unfold it. Repeat on the other side, then unfold the paper again. You should have an ‘X’ in your square running from corner to corner.
In steps 1 and 2, perfection is critical. Ensure the edges are correctly aligned, or your crane won’t have its signature shape.
Step 2: + Fold
Fold the paper in half horizontally, crease well, then unfold it. Repeat the fold on the other side. Now return the paper to its original shape. The lines on the paper should resemble an ’x’ and a ’+’ on top of each other.
Step 3: Squash Fold
Repeat the first fold in step 1, then fold the model in half. You should have a small triangle at this point. Let the top of the triangle face your right. Open the top flap, then press it down until it forms a square.
Step 4: Repeat Fold
Turn the model, so the right edge faces forward. Flip the model over, then fold the triangle toward the left edge.
Step 5: Square Base Fold
Pick the model up, so it stands. You should have one side of the paper with a single fold at the top. Open the two flaps on the side, then press down the paper with the single fold from the top. You have now made a square base.
The following steps will give the model more shape, and it will soon start resembling a bird.
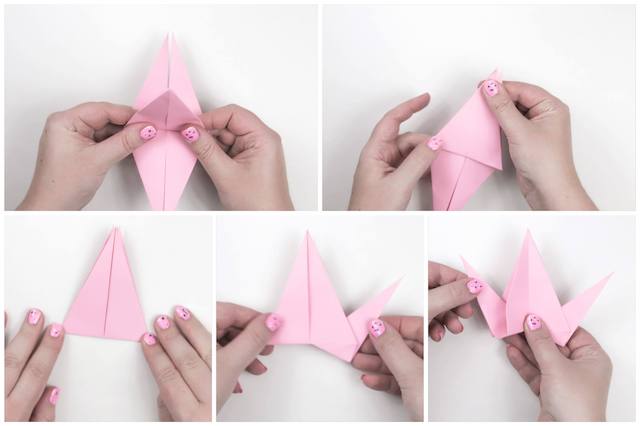
Phase 2: Making a Bird Base
![Making a Bird Base]()
The origami crane is made using a bird base. This base combines a square base and two petal folds. It’s an important phase as you learn to make an origami crane, so pay close attention to detail.
Step 1: Right Flap Fold
Turn the model, so the crease faces you. It should not run diagonally.
Fold the flap on the right to the centerline. The edge of that flap should run along the center crease. Press down firmly, then unfold.
Step 2: Left Flap and Top Fold
Repeat the fold in step 1 on the left side. Crease the fold well, then unfold it.
Afterwards, fold the top down toward the centre crease, then unfold it. You should have an upside-down triangle shape at the centre of the model. It should resemble a frog’s mouth if you lift the top flap.
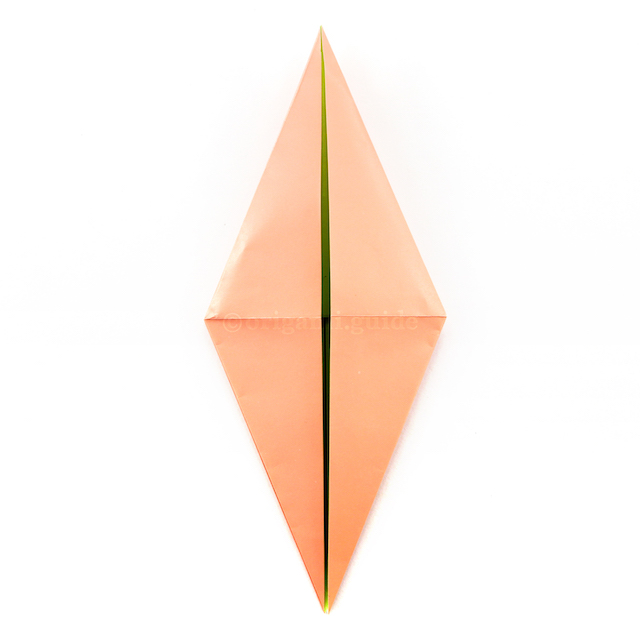
Step 3: Petal Fold
This next part can be tricky, so take it slow. This step turns the frog’s mouth into a petal fold.
Flip-up the top piece of paper, then push in the sides along the creases you created in the previous steps. Flatten the shape along the creases you made until you have a diamond shape.
Step 4: Complete Petal Fold
To complete the petal fold, turn the model over. We’ll complete the steps we took previously on this side.
Start by folding in the left and right sides to the centre crease. Remember to unfold at each stage and match the alignment of the model.
Step 5: Complete the Bird Base
Fold the small top down, crease well, then unfold. Raise the top flap at the bottom of the model. Pop it back, squeeze the edges in, and fold along the creases you just created.
The entire model should look like a diamond. This is the completed bird base. In the following steps, we will define the shape of our origami crane.
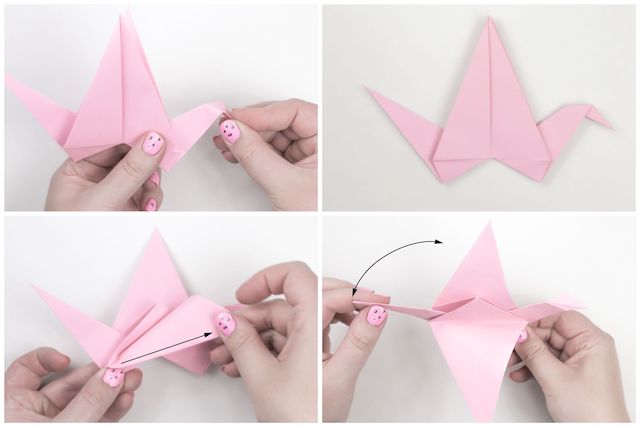
Phase 3: Folding the Neck and the Tail
![Folding the Neck and the Tail]()
This part is the most exciting as you learn to make an origami crane. It’s where you get to see the model take shape and resemble a crane. You must go slow and put those nimble fingers to work to get the folds right.
Step 1: Front Flap Fold
Ensure the gap in the model faces you. This way, it’ll be easier to make the origami crane’s neck and tail.
Fold the top right flap to meet the center line. Don’t open the flap here. Instead, press it down firmly.
Do the same with the left top flap.
Step 2: Back Flap Fold
Flip the paper over and repeat step 1 on this side. Fold the top right flap to the center line. Press the crease down firmly. Next, fold the left top flap to the center, then press it down.
You should have a skinny kite shape at this point.
Step 3: Front Neck and Tail Creases
Lift the long bottom flap on the kite’s right, then fold it to the side. It should hang outside the shape. Crease the fold well, then unfold it.
Repeat on the left side by raising the long bottom flap, then fold it to the side. Press the crease down, then unfold it.
Step 4: Back Neck and Tail Creases
Turn the model over. We’re going to repeat step 3 on this side. Start on the right by lifting the long bottom flap, then fold it to the side.
Press it down, then unfold it. Repeat the fold on the left side, crease it well, and then unfold.
Step 5: Inside Reverse Fold
This step is complicated, so pay close attention to detail and go slow. Here we’ll make an inside reverse fold along the creases on the right and left sides of the model.
Open the model on the right side until you see ample space at the top of the kite. Flip the bottom flap up along the creases you created, then fold it in half.
Pull the flap out of the pocket and align it with the creases you created in step 4. The flap should extend outwards from the body of the model.
Repeat this on the left side. Open the model on the side, flip the bottom flap up, then press down. Fold the flap in half, then turn the model to the side you started working on.
Pull the flap out of the pocket, then pull it down until it aligns with the creases you created. Press down firmly.
Now you’ve created the neck and tail. We’ll complete the origami crane in the following steps by defining the head and wings.
Phase 4: Folding the Head and the Wings
This is the last phase you’ll need to follow to learn to make an origami crane. At this point, your model may not look like a crane. Worry not, for it will soon resemble one.
Let’s start by folding the head.
Step 1: Create the Head Creases
Fold a small section of the right extension of the model forward and down. It shouldn’t be an extensive section, as this is the head.
Next, unfold it, then flip the model around, and we’ll repeat the fold on the other side. Fold the flap, which is now on the left side, backward and down. Unfold it, then turn the model around again.
Step 2: Head Fold
![Head Fold]()
Make another inside reserve fold into the neck by flipping the model upside down. It can be trickier than the one we did for the neck and the tail, so be patient. The final fold should make the head face down and to the right.
Step 3: Fold the Wings Down
Fold-down the wings by taking the top flap and pulling it down with a horizontal crease. Flip the model around and do the same on the other side.
Step 4: Complete the Origami Crane
Now we’ll give it some structure. Make it stand, then gently pull the wings apart at the creases.
Next, turn the crane upside down and gently pull the opposite corners apart. The body should be puffed out between the wings when you flip it back around.
Be sure not to pull too hard on the wings. If they tear, you’ll have to start your origami crane all over.
Congratulations, you’ve successfully created an origami crane. As you learn to make an origami crane, going through the steps will get easier. You may also discover ways to speed up the process.
Conclusion
Once you learn to make an origami crane, you can create all the other origami models. It’s the best model for beginners because it builds skill and patience. As soon as you’ve mastered it, there won’t be an origami model you can’t make.
If you ever need a 1:1 lesson, Lrnkey is just one mouse click away. You can learn several skills on the platform, with lessons provided by online tutors worldwide.
FAQ
How do you make a paper crane step by step?
To make a paper crane you need to learn to make a bird base. From your bird base, you can make two wings, a neck and a tail on your crane. The best way to learn how to make a paper crane is by booking a lesson with an online tutor on Lrnkey.
Are origami cranes hard to make?
Origami cranes are not hard to make but they can take patience. The best way to learn how to make an origami paper crane is by booking an online lesson on Lrnkey. You’ll get live 1:1 coaching to get started on your origami project.
What does it mean when someone gives you an origami crane?
When someone gives you an origami crane in some cultures it means they are wishing you happiness and prosperity. Origami cranes are traditionally given as wedding gifts in Japanese culture.
What happens if you make 1000 paper cranes?
In some cultures, it is believed that if you make 1000 paper cranes you will be granted a wish. This would take a very long time though!
Is origami good for your brain?
Origami is a great skill to try to keep your brain sharp. Folding paper in complex ways is a great way to increase your dexterity and teach your brain a new skill. While it may take patience at first, as your brain learns, origami will get easier.